Category Archives: Tools

Messenger Flash Reviver brings winks back

| Download Messenger Flash Reviver |
| Version 1.0.0.0 SHA-1: 23098BE0BD0F63E50F9FEFF8F1694363142EF1A9 SHA-256: 240F03B39FE73B115B85AB563B081A716B828B0FA3EA3B10B1F7E0EDBAEECA55 |
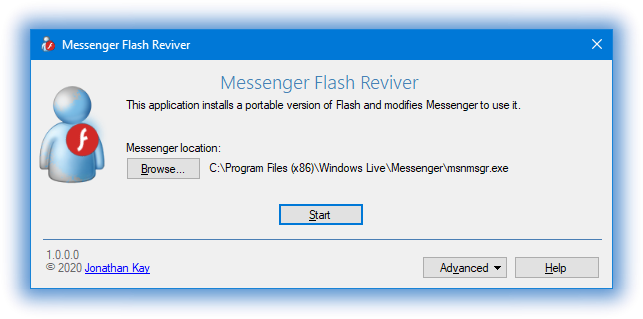
With the immediate demise of Adobe Flash, Messenger Flash Reviver restores the Flash-enabled features (winks, dynamic display pictures) of all versions of Windows Live Messenger and MSN Messenger by installing a portable version of Flash and then modifying Messenger to use it.
Having a problem? Post in the comments below or visit this MessengerGeek forum topic.
How to use
- Download and run Messenger Flash Reviver
- The Windows Live Messenger or MSN Messenger executable file will be automatically detected, or alternatively, you can select the location of the file in any Messenger installation
- Press the Start button
- Messenger will be Flash revived, and then restarted for use
Requirements
- Any version of MSN Messenger or Windows Live Messenger, in any language
- Any version of Windows XP, Windows Vista, Windows 7, Windows 8, or Windows 10
Additional Features
- Optional automatic backup of modified file
- Optional restart of Messenger
- Full logging
- Command line parameters
- Silly little easter egg
- UI available in English, Spanish, French, Hungarian, Dutch, Portuguese, Russian and Greek
Command Line Parameters
Messenger Flash Reviver includes command line arguments for the use in scripts and automation.
| /run | Automatically starts reviving |
| /exe [PathToExe] | Sets the path to the Messenger executable file |
| /nobackup | Disables making a backup of the file before reviving |
| /nomsgrstart | Disables Messenger from being restarted |
| /norestartwin | If files are not modifiable, prevents Windows from being restarted to complete reviving (automatic Windows restart feature triggered by /run) |
| /? or /help | Shows this helpful table |
Errors return errorlevels -2 through -10, successes return 0 or 2, view errorlevel documentation.
Version History
| Dec 30 2020 | 1.0.0.0 | First release of Messenger Flash Reviver |
Butterfly Messenger
It’s no small thing to say that the reaction to Windows Live Messenger 2009 and related clients that use the older Messenger protocol has been pretty intense. Regardless if you’re using Windows XP, you have a favourite feature that’s missing in the 2012 version, or you simply do not want to use Skype, it seems everyone is looking for another option to choose from.
Butterfly Messenger
Butterfly Messenger is an improved working version of the client used to demonstrate MSNPSharp. It supports the same protocol version as Windows Live Messenger 2012 (MSNP21), and has the a basic Messenger feature set.
The current release is an alpha version of Butterfly Messenger intended to be used to collect feedback on bugs, features and other changes. However, it is relatively stable and usable.

System Requirements
Butterfly Messenger currently requires Windows XP or above with at least the .NET Framework 2.0 or above installed.
Although MSNPSharp was deliberately written to support Mono (on other platforms), the client presently does not run on Mono (but probably works on WINE), hopefully this will be addressed later for Linux and/or OS X compatibility.
Download and installation
You can now download the third alpha release of Butterfly Messenger. Due to the early nature of the project, it does not presently have an installer and you will need to extract the files to a folder of your choice and run it from there. Butterfly Messenger makes use of the Segoe UI font (like Messenger). If you do not have the Segoe UI font installed right now, you can install it from the Messenger 2009 files.
Feedback and bugs
Please feel free to leave quick comments here on this post, but if you wish to go in depth, you can make use of the Butterfly Messenger category on the forum.
Known issues
- Depending on the situation, brand new conversation windows may blink even if they’re in focus. If you start typing a reply, they should stop blinking.
- Flickering in the contact list.
- Custom emoticons will appear, but the current conversation window does not support animated GIFs. Animated GIF display pictures work though.
- You cannot rename contacts.
Open Source
Butterfly Messenger is open source software and based on the MSNPSharp project code. A repository will be set up shortly once more details about the project have been finalized.
| Oct 10 2015 | 0.1.2.0 |
|
| Sep 23 2015 | 0.1.1.0 |
|
| Mar 25 2015 | 0.1.0.0 |
|
Adium Messenger Reviver

As there’s been some requests for this, I put together a simple dmg which lets you copy the newly patched libpurple to the correct Adium (/Applications/Adium.app/Contents/Frameworks/libpurple.framework/Versions/Current) folder. Hopefully Adium is updated soon so this won’t be needed.
Update: In addition to the above, due to changes on the Messenger servers, you will now need to make a small adjustment to make Adium work. Choose the Adium menu, choose Preferences, double-click the MSN account, choose the Options category and change the Login Server to be msn.messengergeek.com and click OK. This should be included in a future Adium Reviver version.
The post, Most third-party Messenger clients have gone offline temporarily has more info about the change made.
Additionally, you can also revive the official Messenger:mac client.
Known issues
- If you receive a message that the “libpurple folder” requires an administrator password, you probably don’t have Adium or the right version of Adium installed.
- On some accounts you might not be able to see your full contact list, this should soon be resolved in other clients and hopefully fixed in Adium too.
Messenger Reviver 2:mac
![]()
This page remains here for archival reasons. As of March 12th 2015, the last of the servers accepting sign-ins from Messenger:Mac have gone offline. To use the Messenger service on the Mac, you will need to use Skype, the web-based Outlook.com client, or Windows Live Messenger 2012 in a Windows virtual machine.
Starting November 13th, 2014, Messenger:mac clients are no longer able to sign in to the Messenger service and you will receive the following error:
Sign in to Microsoft Messenger failed because the service is not responding. The service is not available or you may not be connected to the Internet.
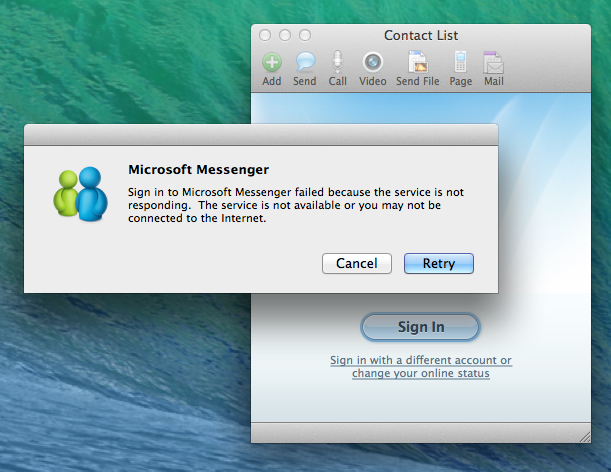
As the underlying problem is similar to the issues from earlier this week, using the same technique used by the third-party clients and for Windows Live Messenger 2009, we can revive Messenger:mac.
Using Messenger Reviver 2:mac
To revive Messenger:mac, download the Messenger Reviver 2 dmg and open it from the Downloads folder. Then right-click on the Messenger Reviver 2 mac icon and choose Open.

If you receive the “unidentified developer” warning message choose Open when asked. Next, you may get a message reminding you that you’re about to install software, click Continue. You can then click Continue to the Introduction screen, then the Install button, type in your password, and finally click the Install Software button. After Reviver has completed, Messenger:mac should re-open and you should be able to sign in.
Important note: Unlike the Windows version, Messenger Reviver 2:mac at this time is not able to automatically download and install Messenger:mac. If you do not already have it installed, you can install it from c|net Download.com.
Known issues and workarounds
When you sign into Messenger:mac after using Reviver:mac, you most likely will see various contact list addition requests from your contact list. This is a side effect of tricking the server, and can either be ignored or dismissed. Unfortunately, they will return again when you sign in again. This issue is being seen in various third party clients as well.
In addition to this, even though contacts appear on your contact list, you might receive a message “Do you want to accept a message from an unknown sender”. Click the Accept button and you can proceed with the conversation.
Lastly, on some accounts you might not appear online to your contacts. Regrettably, this is a result of the same issues above. You can workaround this problem by signing in on another client first (including logging into your Microsoft account at Outlook.com) and then signing into Messenger:mac. The other client will put you online and Messenger:mac will take over your Messenger session.
System Requirements
A compatible version of OS X running Messenger:mac 8.0.1
Installing Windows Live Mesh 2011 with Windows Essentials 2012
![]() Yesterday Microsoft released Windows Essentials 2012 which among other things, removes Windows Live Mesh for SkyDrive (which is barely a comparable product). But unlike the 2011 and 2009 versions of the Essentials, thankfully you can actually install Live Mesh on your existing 2012 installation.
Yesterday Microsoft released Windows Essentials 2012 which among other things, removes Windows Live Mesh for SkyDrive (which is barely a comparable product). But unlike the 2011 and 2009 versions of the Essentials, thankfully you can actually install Live Mesh on your existing 2012 installation.
To make this easy, I’ve written a small tool called Live Mesh Installer.
Getting started with Live Mesh Installer
To get started, download the Live Mesh Installer, choose Run if possible or download and open the zip file yourself. Next, just run the LiveMeshInstaller.exe inside the zip file and choose Yes when prompted for administrator rights.
Finally choose the language version you prefer from the list and then select the Begin button. The Installer will then download the Windows Live Essentials 2011 web installer and automatically install Windows Live Mesh. Please note that installation will take some time as it will need to download, extract and install Live Mesh. When it is complete, Live Mesh will start automatically.
Options
If you prefer to see what’s happening with the installation, uncheck the ‘Hide installation wizard’ option before you begin. When the Windows Live Essentials setup begins, you will be prompted to either install all the products or choose the ones you prefer. Only Live Mesh will be installed on either option (unless you choose others specifically in the choose screen).
Final notes
Unfortunately as Windows Essentials 2012 is hardcoded to remove Live Mesh, any upgrades or changes you make to your Windows Essentials 2012 installation will result in Live Mesh being removed again. If this happens, just re-run the tool and install it again. Hopefully this won’t happen too often.
Version history
09/01/2012 1.1.1.0 Fixed Italian not showing in the list
08/19/2012 1.1.0.0 Added the remaining languages
08/08/2012 1.0.0.0 First release of Live Mesh Installer
How to disable Messenger (Messaging) in Outlook.com
Last week, Microsoft announced (yet another) rebrand of Hotmail to Outlook.com. It has received plenty of favourable reviews and praise but one feature is extremely annoying – and that is, like the Windows 8 Metro Windows 8-style UI Messaging application, it automatically logs you into Messenger and connected services (Facebook Chat) when you sign in, with no ability to log off instant messaging except for setting your status to “invisible”. (Side note: Windows 8 Messaging now thankfully has a global off switch added into its settings since the Release Preview.)
I’m sure there are people who don’t mind this – perhaps they don’t use instant messaging or they keep webmail open all the time anyway (in fact you get a small bonus feature if you do). I personally use the actual Outlook desktop application and only use webmail when I’m away from my own PC, so I’m not too keen to be speaking of people when I’m just trying to quickly access my email from other locations.
So I looked for a way to disable this from happening and after rummaging through the options unsuccessfully, some searches to see if anyone else had already figured it out, I started looking through the code, and found the key: geo.messenger.services.live.com geo.gateway.messenger.live.com (changed December 2012).
So to disable Outlook.com’s Messaging feature, all one has to do is block this host and the easiest way to do this is to add it to your hosts file. If you’re not sure how to do this or want to save time, I’ve made a quick tool for Windows users below which you can easily run to automatically add (or remove) blocking this host. To make this change yourself manually, you find yourself on a machine without administrator rights, or you use another operating system, see Other Options below.
Download the Disable Outlook.com Messaging tool
Using the tool
To start, download the Disable Outlook.com Messaging tool, open the zip file, and run the application inside. You’ll be prompted for administrator rights so the tool can make modifications to your hosts file, and then you’ll receive a message indicating the change has been made. Please note you’ll need to restart your browser to see the change.
To remove the entry in the hosts file, run the tool again, the messenger entry will be removed and you’ll receive a message notifying you as such.
If required, you can use the /q command line parameter to avoid seeing the notification messages that the change has been added or removed.
After the change
Once the hosts file entry has been added, when you click Messaging in Outlook.com, you will see an attempt to sign in but it never will be successful. With the new Messaging pane added in 2014, you will also need to collapse the Messaging pane by clicking on it:
Other options
If you wish to add the entry to the hosts file yourself and use Windows, press the Start button (if you use Windows XP, click the Run option) and type:
notepad %systemroot%\system32\drivers\etc\hosts
then press Ctrl-Shift-Enter to start Notepad with administrator rights. Once Notepad starts, add the following line:
0.0.0.0 geo.gateway.messenger.live.com
Then close Notepad and save. Now just restart your browser to see the change.
If you’re on a Windows machine without the ability to get administrator rights, such as a work setup or library and there is an available version of Internet Explorer available, commenter qiang reminded me that you can use the Restricted Sites zone to block specific hosts like this one. To do so, after starting Internet Explorer, press the Alt key on the keyboard to bring up the menu bar, choose Tools, then Internet Options, then the Security tab, choose Restricted sites and finally press the Sites button. In the ‘Add this website to the zone:’ box, type geo.gateway.messenger.live.com and choose Add. Then click Close, and OK in the remaining open options windows. If outlook.com is already open, sign out outlook.com and sign back in to see the change.
If you’re using another operating system, the How-To Geek has tutorials for both Ubuntu Linux and OS X (the Windows one is missing the fact you need to start Notepad in Administrator mode if you’re following this guide).
Additionally, you could use firewall software to block outgoing connects to this hosts. Unfortunately the built-in Windows firewall only supports IP addresses and since these can change, it isn’t too useful for the purposes of blocking this.
Final notes
As modifying the hosts file requires administrator rights, this probably won’t be successful on machines you might use when you’re out and about. Of course, the best solution would be for Microsoft to add this feature into Outlook.com itself and in fact, the web messenger in Hotmail initially didn’t allow you to log out either but the feature was added later on. I certainly have no idea why is was deemed unimportant to be included in the current release of Outlook.com and it seems many of you agree with me.
Use Messenger Reviver to bypass the Windows Live Messenger 2009 forced upgrade
UPDATE (4/23/2013): Use Messenger Reviver 2 instead to bypass the forced upgrade to Skype.
Microsoft today started forcing upgrades to Windows Live Messenger 2011 on Windows 7. Unfortunately the 2011 version drops several key features, adds several annoying features, and is not that impressive of an upgrade. Certainly many just prefer to use Live Messenger 2009 and now you can (again).
You will receive one of the following messages if you’re being forced to upgrade:
A newer version is available. You must install the newer version in order to continue. Would you like to do this now?
A newer version has been downloaded and is available. You must install this newer version in order to continue. Would you like to do this now?

To bypass the forced upgrade for Windows Live Messenger 2009, download my Messenger Reviver utility below, open the MessengerReviver.exe file contained within the zip file and click Start. Messenger should automatically exit and then restart normally. You should then be allowed to sign in again.

Download Messenger Reviver
Replaced by Messenger Reviver 2
Note that Messenger Reviver requires administrative rights and you will be prompted to authorize if you have UAC engaged.
Requirements
Windows XP, Windows Vista, Windows 7 (any edition of these)
.NET Framework 2.0 or higher (already included with Windows Vista and Windows 7)
Windows Live Messenger 2009 14.0.8089.726 or 14.0.8117.416
Frequently asked questions
Does it work with other modifications to Messenger?
Yes, Messenger Reviver will not remove any changes you’ve made to Messenger. However, if you use such a tool later, you may need to re-run the reviver afterwards.
I am receiving a “Updating Messenger failed” message, how can I fix this?
Although Reviver does several checks and offers solutions to some obvious problems, if Messenger has been heavily modified by other tools, it may not be possible to apply Messenger Reviver. Instead, you may need to repair your Messenger files. Assuming you are using the last version of Messenger 2009, click Start, then Run, enter the following and click OK:
msiexec /fa {B57EAFF2-D6EE-4C6C-9175-ED9F17BFC1BC}
After the Windows Installer completes its work, try using Messenger Reviver again.
A different solution
If you encounter additional problems or don’t like the idea of someone else tweaking with Messenger, another solution to getting signed in again is setting the Windows Live Messenger shortcut into Windows XP compatibility mode. To do this, locate the Windows Live Messenger shortcut on the start menu, right-click the shortcut, choose Properties, then choose the Compatibility tab, choose Windows XP (Service Pack 3) and then click OK. If Messenger is already running, restart it and you should now be able to sign in. Unfortunately by using this compatibility solution, Messenger will change its behaviour as it would operate under Windows XP (for example, a notification area icon with status instead of in the taskbar, and so on). Additionally, some features in Messenger may not work properly since it assumes you’re on Windows XP (for example, Remote Assistance). Messenger Reviver does not have these limitations and I don’t personally recommend using the compatibility technique if you don’t have to.
Version history
06/19/2012 1.2.0.0 First release of Messenger Reviver (this is version 1.2 as it is based on the original Link Reviver code)
