Monthly Archives: February 2012
How to stop the built-in Messenger from signing in on Windows 8 Consumer Preview
Updates to this article:
Mar 30/2012: There have been multiple changes to Metro Messenger this past month and the below no longer is sufficient to stop Messenger from signing in. However, these changes seem to have finally added MPOP support (that is, allow you to use Metro Messenger and the normal Messenger client at the same time) and so it’s not nearly maddening as it was initially. I may go back and review this in the coming month.
Mar 2/2012: After redoing my investigation, I figured out that I had missed another connection. It seems to also connect to 65.54.52.45 (otherwise known as beta.xmpp.messenger.live.com) to start the Messenger connection process. Blocking this stopped the below mentioned signout problem. I’ve tweaked the command lines above to reflect this and changed the name of the rule. Based on this information it seems the new client uses XMPP, but that will be the topic for a later article.
Mar 1/2012: Messing around more this evening with Windows 8 has caused my “classic” Messenger client to sign out a few times, even though the built-in Messenger client still claims it can’t connect. I will investigate more shortly to see why that is, although the above still should provide some satisfaction, but probably isn’t a perfect solution just yet.
—
It’s only been out for a few hours now, but the built-in Messenger client in Windows 8 Consumer Preview is causing me severe mental anguish. I’ll withhold my opinions of the client till later, but it seems to want to constantly connect and there does not appear to be any immediate way to turn this “feature” off. Furthermore, I don’t really want to use this client for Messenger purposes.
So after being rapidly compelled to find out what it is trying to connect to, I think I’ve sorted out a (temporary) solution to disable this built-in Messenger client using the Windows Firewall.
To do so, open an elevated Command Prompt by moving the mouse to left-hand corner until the Start box appears, then right-click and choose Command Prompt (Admin).

Confirm the operation, and then copy one of the following application lines into the clipboard:
For 32-bit Windows 8:
netsh advfirewall firewall add rule name="MetroMessengerXMPP" action="block" dir="out" program="c:\program files\windowsapps\microsoft.windowscommunicationsapps_16.2.3237.215_x86__8wekyb3d8bbwe\LiveComm.exe" remoteip="65.54.52.45,65.54.48.0/24"
For 64-bit Windows 8:
netsh advfirewall firewall add rule name="MetroMessengerXMPP" action="block" dir="out" program="c:\program files\windowsapps\microsoft.windowscommunicationsapps_16.2.3237.215_x64__8wekyb3d8bbwe\LiveComm.exe" remoteip="65.54.52.45,65.54.48.0/24"
Then right-click in the Command Prompt area, choose Paste and press Enter.


You can close the Command Prompt now. Messenger should no longer be able to sign in any more, but the rest of the Windows 8 features should continue to work (including Mail). This works by restricting the LiveComm.exe process from communicating with the Messenger servers at the 65.54.52.45 and 65.54.48.0/24 blocks of IP addresses. Hopefully they won’t decide to change the addressing scheme any time soon.
Note: As I’ve only had a few hours to test this, there may be unforeseen connection problems or it may even stop working later on. You can remove or edit this firewall rule by using the Advanced Firewall configuration (run “wf.msc”).
Enabling Easy Connect Remote Assistance in a domain environment
Back in the days of Windows XP, those using Remote Assistance regularly tended to prefer establishing Remote Assistance sessions using the built-in Windows Messenger client. These days, Easy Connect (added in Windows 7/Server 2008 R2) tends to be the preferred method.
But one major problem with using Easy Connect is within a domain joined computer, it informs you that Easy Connect is not available and does little to tell you why.

As the rather uninformative documentation will inform you, Easy Connect makes use of Microsoft’s “Peer Name Resolution Protocol” (PNRP). You can read more about the inner workings of PNRP, but the key is its use of IPv6 to function. As most of us do not have IPv6 support from our service providers, Windows makes use of Microsoft’s Teredo technology to tunnel you to IPv6 addresses.
So it is Teredo, which Windows automatically turns off in a domain environment that needs to be configured for Easy Connect to work.
Checking Teredo’s present status
You can check if Teredo is enabled by using netsh on the command line:
netsh int teredo show state

By default, Teredo is set in the “client” type. In a domain (managed) environment, you will receive “client is in a managed network” under the Error category when showing the Teredo state.
Enabling Teredo in a domain for Easy Connect
To enable Teredo in a managed domain environment, you’ll need to set the client type to “enterpriseclient”. To do this, depending on your scenario, you can use the netsh command on a single computer or the domain’s group policies to enable multiple machines.
Using netsh
Open an elevated command prompt and type:
netsh int teredo set state type=enterpriseclient

Note that this is a per-machine change, so anyone logging into the computer will get Teredo access.
Using group policy
In Group Policy Management (or related tool), Edit the GPO which affects the machines (ie. Default Domain Policy), navigate to Computer Configuration, Policies, Administrative Templates, Network, TCPIP Settings, IPv6 Transition Technologies and set the Teredo State setting to Enterprise Client.


As soon as the machines get this policy change (or use gpupdate /force on the clients), the setting will immediately work without a Windows restart.
Verifying Teredo is operational
You can again do the netsh int teredo show state command again to check that Teredo is now enabled and operational. If you used Group Policy to enable the setting, you’ll see (Group Policy) tagged after the Type field:

You can also test Teredo by pinging an IPv6 resource like Google:
ping 2607:f8b0:4001:c01::67

Checking Easy Connect
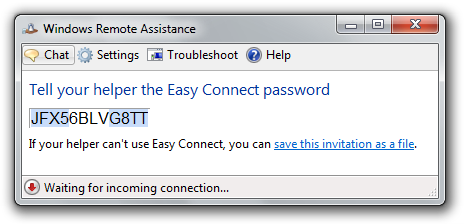
To verify Easy Connect is now working, launch Remote Assistance (msra.exe), choose Invite someone you trust to help you, choose the Use Easy Connect option and after its network check, you should receive an invitation code.
A word about Windows Server 2008 R2
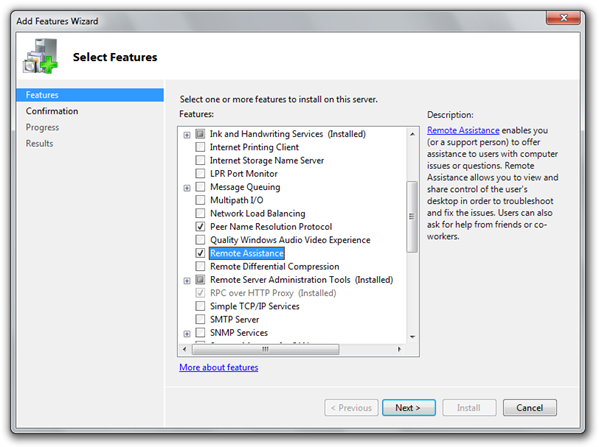
There may be instances where you wish to use Easy Connect on a computer using Windows Server 2008 R2. To enable this, you’ll need to go into the Server Manager and install both the Peer Name Resolution Protocol and Remote Assistance. After this is complete, you can enable Teredo as above.

Final notes
If the Peer Name Resolution Protocol service is set to Disabled or not installed, the Easy Connect option will be grayed out in the Remote Assistance window. The service can be set to Manual (which is the default) as it will be automatically started by Remote Assistance when you go to use it.
Since Teredo can be easily toggled on a whim using netsh, those who prefer not to have Teredo enabled full-time can very easily write a script to automatically enable it prior to starting a remote session and then disable it afterwards.
A small disclaimer: be aware that there are many networking issues which can prevent Easy Connect (more specifically PNRP or Teredo) from working properly, especially problems involving routers, virtualization software or VPNs. Additionally, some or all of the public Teredo tunneling servers may not be available to you. This article does not address any of those difficulties and the Teredo state setting solely enables Teredo to work when Windows believes it is in a domain environment.
